1.三个示例引入Stream

1.1 创建流

 1
 2
 3
 4
 5
 6
 7
 8
 9
10
11
12
13
14
15
// 引入fs模块
const fs = require('fs')
// 利用fs创建流
const stream = fs.createWriteStream('./big_file.txt')

// 写数据
for (let i = 0; i < 100000; i++) {
    stream.write(`这是第${i}行内容,我们需要很多很多内容\n`)
}
// 关闭流
stream.end()
console.log('done')

//命令行执行
node 1.js
  • 分析

    • 流程:打开流,多次往里面塞内容,关闭流
    • 看起来就是可以多次写,没什么大不了的
    • 最终得到一个100M左右的文件
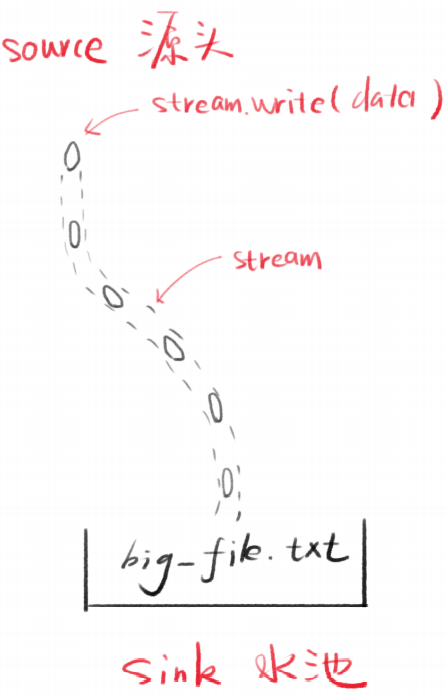
  • Stream是水流,但默认没有水

  • stream.write可以让水流中有水(数据)

  • 每次写入的数据片段叫做chunk(块)

  • 产生数据的一端叫做source

  • 接收数据的一端叫做sink

image-20210803164712797

1.2 浏览器直接读取文件

 1
 2
 3
 4
 5
 6
 7
 8
 9
10
11
12
13
14
15
16
17
// 引入文件模块
const fs = require('fs')
// 引入http模块
const http = require('http')

// 开启服务器
const server = http.createServer()
server.on('request', (request, response) => {
    // 读取文件
    fs.readFile('./big_file.txt', (error, data) => {
        if (error) throw error
        response.end(data)
        console.log('done')
    })
})
// 开启监听端口
server.listen(8888)
  • 分析
    • 用任务管理器看Node.js内存占用,相对比较高
    • 如果多人同时访问服务器中的此文件,内存占用就爆炸了

1.3 Stream读取文件

用Stream改写第二个例子

 1
 2
 3
 4
 5
 6
 7
 8
 9
10
const http = require('http')
const fs = require('fs')

const server = http.createServer()
server.on('request', (request, response) => {
    // 利用流读取文件
    const stream = fs.createReadStream('./big_file.txt')
    stream.pipe(response)
})
server.listen(8888)
  • 占用内存较低

  • 管道

    • 两个流可以用一个管道相连
    • stream1的末尾连接上stream2的开端
    • 只要stream1有数据,就会流到stream2
  • 常用代码

    1
    2
    
    stream1.pipe(stream2)
    // 可读的流.pipe(可写的流)
    
  • 链式操作

    1
    2
    3
    4
    
    a.pipe(b).pipe(c)
    // 等价于
    a.pipe(b)
    b.pipe(c)
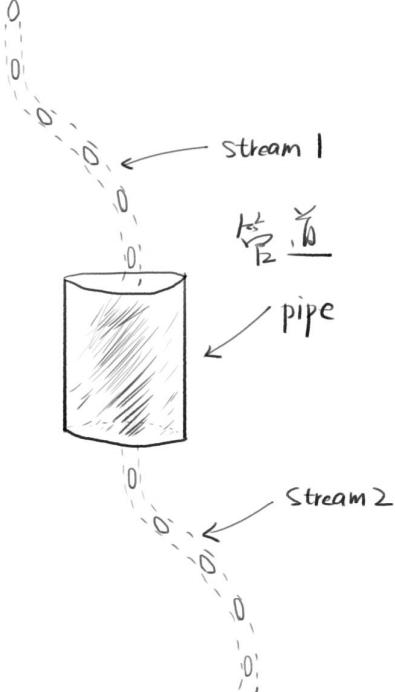
    

    image-20210803164747769

  • 管道实际上是事件的封装

    1
    2
    3
    4
    5
    6
    7
    8
    
    // stream1一有数据就塞给stream2
    stream1.on('data', chunk => {
    	stream2.write(chunk)
    })
    // stream1停了,就停掉stream2
    stream1.on('end', () => {
    	stream2.end()
    })
    

    如果需要自定义的方式去使用流的话,那么事件监听是个不错的选择。

1.4 总结

  • 流(stream)是一种在 Node.js 中处理流式数据的抽象接口。 stream 模块提供了一些基础的 API,用于构建实现了流接口的对象。
  • Node.js 提供了多种流对象。 例如,发送到 HTTP 服务器的请求和 process.stdout 都是流的实例。
  • 优势:
    • 非阻塞式的数据处理方式可提升效率
    • chunk数据分块可节省内存
    • 管道可提升扩展性,方便组合

2 Stream对象的原型链

  • console.log(createReafStream(path))
    • 自身属性:由fs.ReadStream构造
    • 原型:stream.Readable.prototype
    • 二级原型:stream.Stream.prototype
    • 三级原型:events.EventEmitter.prototype
    • 四级原型:Object.prototype
  • Stream对象都继承了EventEmitter

3 支持的事件和方法

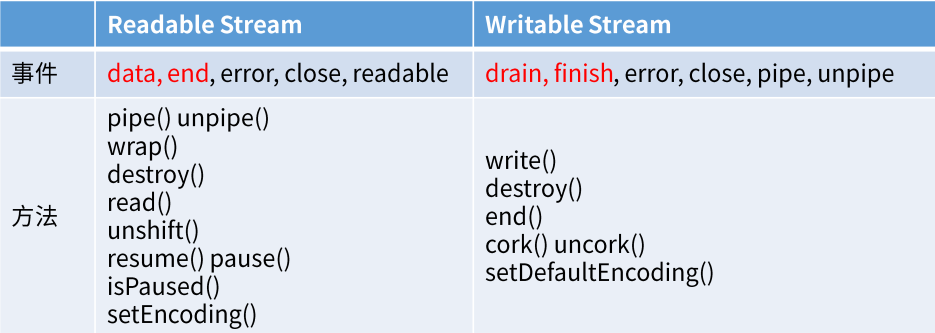
image-20210803164814707

  • data事件

    1
    2
    3
    4
    
    stream.on('data', chunk => {
    	console.log('读取了一次数据')
    	console.log(chunk)// 每次读取的数据片段(Buffer二进制)
    })
    
  • end事件

    1
    2
    3
    
    stream.on('end', () => {
    	console.log('数据读完了')
    })
    
  • error事件:文件丢失,文件权限问题

  • **drain**事件:之前拥堵的水流现在已经干涸了

    • 当写的速度远远小于读的速度时,数据在管道中会出现拥堵的现象
    • 面试常考
  • cork():强制把所有写入的数据都缓冲到内存中,用到再学

4 Stream分类

名称 特点
Readable 可读
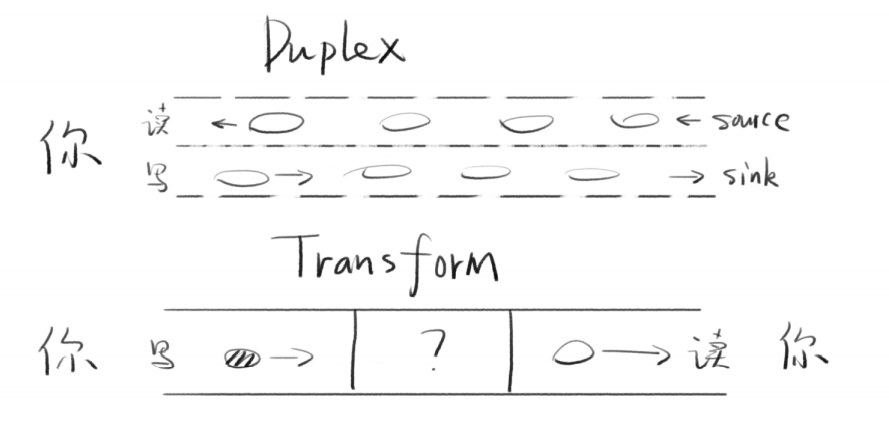
Writable 可写
Duplex 可读可写(双向)默认情况下,读和写是两条互相独立的通道
Transform 可读可写(变化)例如babel,写es6,读到es5,流相当于转换器

image-20210803171028687

5 Readable和Writable的特点

5.1 Readable Stream

  • 静止态paused和流动态flowing

    • 默认处于paused态
    • 添加data事件监听(或pipe),就变为flowing态
    • 删除data事件监听(或pipe),就变为paused态
    • pause()可以将流变为paused
    • resume()可以将它变为flowing
    1
    2
    3
    4
    5
    
    stream.pipe(reponse)
    stream.pause()// 静止态
    setTimeOut(() => {
    	stream.resume()// 3s后恢复为流动态
    }, 3000)
    

5.2 Writable Stream

  • drain流干了事件

    • 表示可以加点水了

    • 我们调用stream.write(chunk)的时候,可能会得到false

    • false的意思就是写的太频繁了,数据积压了

    • 这个时候我们就不能再write了,要监听drain

    • 等drain事件触发了,我们才能继续write

    • https://nodejs.org/api/stream.html#stream_event_drain

 1
 2
 3
 4
 5
 6
 7
 8
 9
10
11
12
13
14
15
16
17
18
19
20
21
22
23
24
25
26
27
28
29
30
31
32
33
34
35
36
37
38
const fs = require('fs')

function writeOneMillionTimes(writer, data) {
    let i = 1000000
    write()

    function write() {
        let ok = true //默认可以写
        do {
            i--
            if (i === 0) {
                // 最后一次写
                writer.write(data)
            } else {
                // 如果i不为0,则说明还继续写
                // 向writer中写数据的同时,把值给ok,进入下一次判断
                ok = writer.write(data)
                if (ok === false) {
                    console.log('不能再写了')
                }
            }
        } while (i > 0 && ok)

        // 如果ok不为true(写不进去值了)
        if (i > 0) {
            // 就监听writer的drain事件
            writer.once('drain', () => {
                console.log('干涸了,可以写了')
                // 如果drain事件触发了,则继续写
                write()
            })
        }
    }
}

const writer = fs.createWriteStream('./big_file.txt')

writeOneMillionTimes(writer, 'hello world')
  • finish事件
    • 调用stream.end()之后,触发finish事件
    • 缓冲区数据都已经传给底层系统之后,触发finish事件

6 创建流

6.1 创建Writable Stream

 1
 2
 3
 4
 5
 6
 7
 8
 9
10
11
12
13
14
15
const { Writable } = require('stream')

const outStream = new Writable({
    write(chunk, encoding, callback) {
        console.log(chunk.toString())
        callback()
    }
})

// process.stdin是一个用户输入stream
process.stdin.pipe(outStream)
// 用监听事件改写
// process.stdin.on('data', chunk => {
//     outStream.write(chunk)
// })

6.2 创建Readable Stream

 1
 2
 3
 4
 5
 6
 7
 8
 9
10
11
12
13
14
15
const { Readable } = require('stream')

const inStream = new Readable()

inStream.push("ABCDEFGH")
inStream.push('IJKLMNOP')
inStream.push(null)

// 等同于inStream.pipe(process.stdout)
inStream.on('data', chunk => {
    process.stdout.write(chunk)
    console.log('写了一次数据')
})

// 这个流是先推再读 不管读没读 都推进去了 不推荐 
 1
 2
 3
 4
 5
 6
 7
 8
 9
10
11
12
13
14
15
16
const { Readable } = require('stream')

const inStream = new Readable({
    read(size) {
        const char = String.fromCharCode(this.currentCharCode++)
        this.push(char)
        console.log(`推了${char}`)
        if (this.currentCharCode > 90) {// Z
            this.push(null)
        }
    }
})

inStream.currentCharCode = 65 // A

inStream.pipe(process.stdout)// d

6.3 创建duplex流

 1
 2
 3
 4
 5
 6
 7
 8
 9
10
11
12
13
14
const { Duplex } = require("stream")

const inoutStream = new Duplex({
	write(chunk, encoding, callback) {
		console.log(chunk.toString());
		callback();
	},
	read(size) {
		this.push(String.fromCharCode(this.currentCharCode++));
		if (this.currentCharCode > 90) {
			this.push(null);
		}
	}
});

6.4 创建transfrom流

 1
 2
 3
 4
 5
 6
 7
 8
 9
10
const { Transform } = require("stream");

const upperCaseTr = new Transform({
	transform(chunk, encoding, callback) {
		this.push(chunk.toString().toUpperCase());
		callback();
	}
});
// 将用户输入的字符传到transform流中进行大写处理,再打印输出出来
process.stdin.pipe(upperCaseTr).pipe(process.stdout);
  • 内置的transform流(压缩文件)

     1
     2
     3
     4
     5
     6
     7
     8
     9
    10
    11
    12
    13
    14
    15
    
    const fs = require("fs");
    const zlib = require("zlib");
    const file = process.argv[2];// 获取用户传的第二个参数(路径)
    
    fs.createReadStream(file)
    	// 每读一点数据,就传给Gzip压缩
    	.pipe(zlib.createGzip())
    	// 没完成一次chunk的传输,就打印输出一个'.'
    	.on("data", () => process.stdout.write("."))
    	// 将数据保存在以.gz结尾的文件中
    	.pipe(fs.createWriteStream(file + ".gz"))
    	// 传输完成,输出'Done'
    	.on("finish", () => console.log("Done"));
    
    // node gzip.js ./big_file.txt
    
  • 单独封装transform流

     1
     2
     3
     4
     5
     6
     7
     8
     9
    10
    11
    12
    13
    14
    15
    16
    17
    18
    19
    20
    21
    
    const fs = require("fs");
    const zlib = require("zlib");
    const file = process.argv[2];
    const { Transform } = require("stream");
    
    const reportProgress = new Transform({
    	transform(chunk, encoding, callback) {
    		process.stdout.write(".");
            // this.push(chunk)是一样的
            // 因为callback总是会运行,所以将chunk写到callback第二个参数,继续传输
    		callback(null, chunk);// 第一个参数表示当出错的时候传null
    	}
    });
    fs.createReadStream(file)
    	.pipe(zlib.createGzip())
    	// 说明,我们可以对数据进行无限次的处理,只需用pipe连接一个transform流即可
    	.pipe(reportProgress)
    	.pipe(fs.createWriteStream(file + ".gz"))
    	.on("finish", () => console.log("Done"));
    
    // node gzip.js ./big_file.txt
    
  • 加密并压缩

     1
     2
     3
     4
     5
     6
     7
     8
     9
    10
    11
    
    // 引入node自带的crypto加密模块
    const crypto = require("crypto");
    // ..
    fs.createReadStream(file)
    	// 使用crypto对文件使用aes192方式加密
    	.pipe(crypto.createCipher("aes192", "123456"))
    	// 注意应先加密再压缩
    	.pipe(zlib.createGzip())
    	.pipe(reportProgress)
    	.pipe(fs.createWriteStream(file + ".gz"))
    	.on("finish", () => console.log("Done"));
    

7 Node.js中的Stream
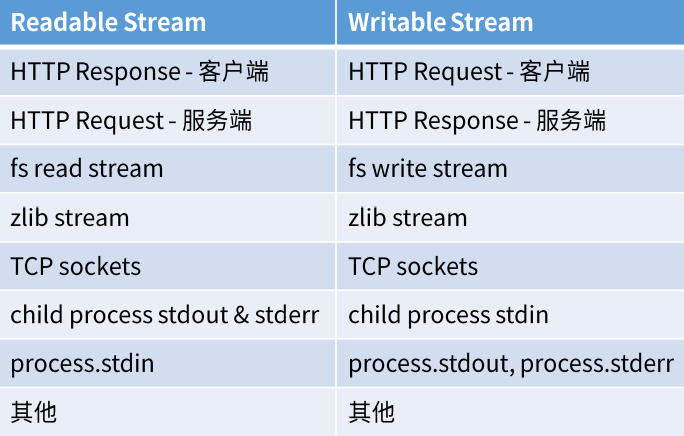
image-20210803215605939

8 参考