1 Koa的基础使用
1.1 Koa简介
-
Koa是由Express开发团队打造的一种全新的Web框架。通过基于Promise、async/await的异步编程,Koa应用可以不使用回调,大大提高了开发效率。Koa在其核心并未捆绑任何中间件(甚至路由功能都需要外部中间件完成)
-
Koa框架和Express框架的主要差别在于异步编程和中间件方面(以及编程模型),其他特性是相似的。
-
由于Koa进行异步调用时强制使用async/await,因此需要将异步回调方法(例如Node核心模块fs)转换为Promise,这里使用的是Bluebird,它是Node.js最出名的Promise实现,可以将回调形式的异步方法包装为Promise函数,不需要传递回调函数,而是通过Promise获取结果。
 1
 2
 3
 4
 5
 6
 7
 8
 9
10
11
|
const bluebird = require('bluebird')
const fs = require('fs')

bluebird.promisifyAll(fs)// 包装fs对象

// fs经过包装后,就可以使用readFileAsync而不是readFile方法了
fs.readFileAsync('./data.log', { encoding: 'utf8' }).then((data) => {
	console.log(data)
}).catch((error) => {
	console.log(error)
})
|
1.2 快速开始
 1
 2
 3
 4
 5
 6
 7
 8
 9
10
11
12
|
// 导入模块
const koa = require('koa')
// 实例化应用
const app = new koa()
// 中间件
app.use(async (ctx) => {
	ctx.body = "Hello Koa"
})
// 监听
app.listen(8080, () => {
	console.log('listening 8080...')
})
|
- Koa的中间件功能和Express中间件是类似的,也可以访问请求对象、响应对象以及next函数,但没有提供路由功能,无法根据根据请求路径和请求方法来返回不同的响应。
2 Koa的上下文
Koa提供了Context对象作为中间件的参数,表示上下文。它可以理解为一个“容器”,挂载了本次请求的请求对象和响应对象等信息。
2.1 常用属性或方法
| 类型 |
名称 |
描述 |
| 全局 |
ctx.state |
对于中间件的全局变量,同时模板(ejs)中也可以直接使用 |
|
ctx.throw(status, ‘message’, { options }) |
抛出HTTP异常,默认status=500,expose=false(对客户端不可见) |
| request |
ctx.headers |
请求报头 |
|
ctx.method |
请求方法 |
|
ctx.url |
请求链接(访问的是啥就是啥) |
|
ctx.path |
请求路径(出去请求参数的纯路径) |
|
ctx.query |
解析后的GET参数对象(url中问号后面的) |
|
ctx.params |
路由参数(例如/user/:id的id字段) |
|
ctx.host |
当前域名 |
|
ctx.ip |
客户端ip |
|
ctx.ips |
反向代理环境下的客户端ip列表 |
|
ctx.get() |
读取请求报头的某个字段 |
| response |
ctx.body |
响应体,支持string、object、Buffer |
|
ctx.status |
响应状态码 |
|
ctx.type |
响应体类型 |
|
ctx.redirect(‘url’, ‘message’) |
重定向 |
|
ctx.set() |
设置响应头指定字段 |
2.2 Cookie操作
通过Cookie,服务端可以表示用户以及用户身份
2.2.1 Cookie签名
由于Cookie存放在浏览器端,存在被篡改风险,因此Web应用一般会在存放数据的时候同时存放一个签名cookie。Koa中需要配置Cookie签名密匙才能使用Cookie功能
1
2
3
|
const koa = require('koa')
const app = new Koa()
app.keys = ['aghkehFlie123hfsk']
|
也可以自定义KeyGrip实例:
1
|
app.keys = new KeyGrip(['gsq','zs'], 'gsemir')
|
2.2.2 写入Cookie
1
|
ctx.cookies.set('key', 'value', { options })
|
示例:
1
2
3
4
5
6
7
|
app.use(async (ctx) => {
	ctx.cookies.set('logged', 1, {
		signed: true, // cookie签名
		httpOnly: true,
		maxAge: 3600*24*100 // 有效期1天
	})
})
|
设置完成后,可以查看浏览器cookie列表,列表中除logged之外,还有用于签名验证的logged.sig
2.2.3 读取Cookie
1
|
ctx.cookies.get(name, { options })
|
示例:
1
2
3
|
app.use(async (ctx) => {
	const logged = ctx.cookies.get('logged', { signed: true })
})
|
3 Koa的中间件
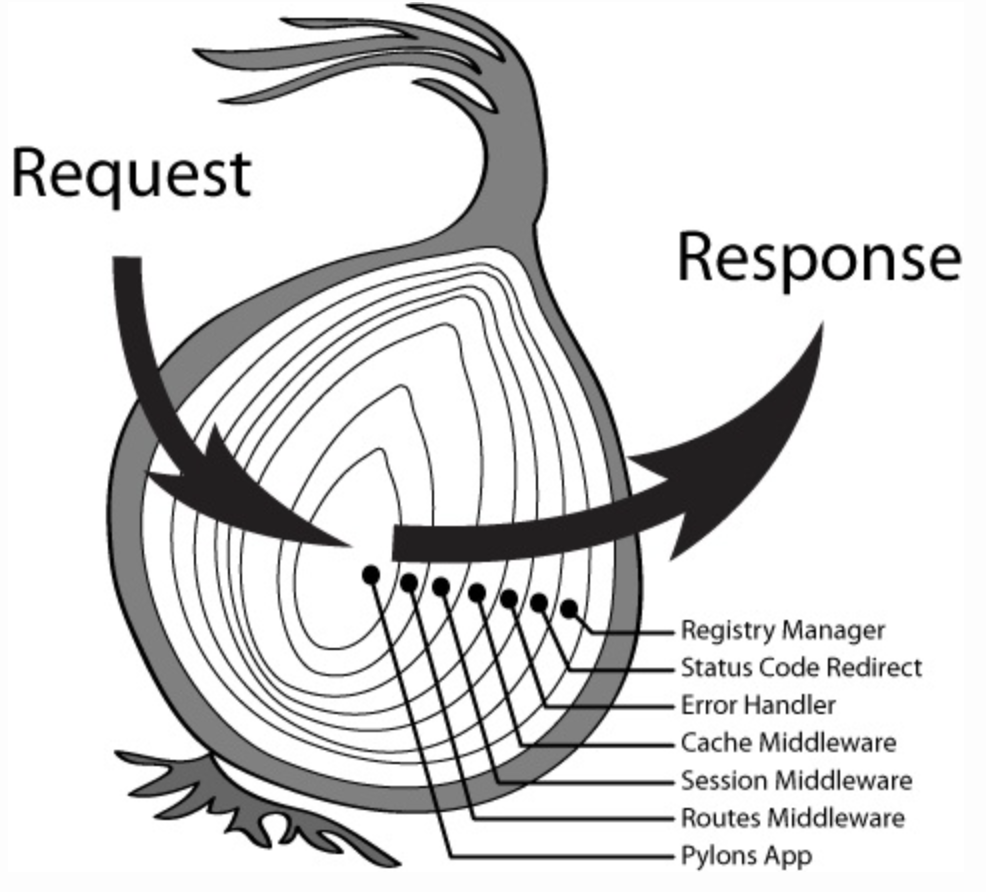
3.1 洋葱圈模型
Koa的中间件运行完逻辑代码,需调用await next()才能将请求交给下一个中间件处理。下图为Koa中间件的执行流程

- Koa的中间件模型为“洋葱圈模型”,请求从左边进入,有序地经过中间件处理,最终从右边输出响应。
- 最先use的中间件在最外层,最后use的中间件在最内层。
- 一般的中间件会执行两次,调用next之前为第一次,也就是洋葱左半边的部分,从外层向内层依次执行。当后续没有中间件时(即中间件中没有next时),就进入响应流程,也就是洋葱右半边的部分,从内层向外层依次执行,这是第二次执行。
- 示例:
 1
 2
 3
 4
 5
 6
 7
 8
 9
10
11
12
13
14
15
16
17
18
19
20
21
|
const koa = require('koa')
const app = new koa()
// 中间件1
async function middleware1(ctx, next) {
	console.log('middleware1 start')
	await next()
	console.log('middleware1 end')
}
// 中间件2
async function middleware2(ctx, next) {
	console.log('middleware2 start')
	await next()
	console.log('middleware2 end')
}
app.use(middleware1)
app.use(middleware2)
// 路由中间件
app.use(async(ctx) => {
	console.log('router')
})
app.listen(8080)
|
访问http://localhost:8080,终端输出如下:
1
2
3
4
5
|
middleware1 start
middleware2 start
router
middelware1 end
middleware2 end
|
3.2 实例:请求日志中间件
利用每个中间件有两次执行机会的特性,开发一个日志中间件,输出请求方法和处理时长
1
2
3
4
5
|
async function logger (ctx, next){
	const start = Date.now()
	await next()
	console.log(`${ ctx.method } ${ Date.now() - start }ms`)
}
|
3.3 编写可配置的中间件
与Express类似,Koa也可以通过“函数返回一个新函数”来编写可配置的中间件。
1
2
3
4
5
|
function middlewareName(options) { // 选项
	return async function(ctx, next) { // 真正的中间件

	}
}
|
3.4 路由函数(全局中间件)
Koa核心没有提供路由功能,但是可以使用一个默认的路由函数来提供响应,所有的请求都会执行该默认的路由函数。
1
|
async function(ctx, next)
|
若函数内部未使用异步逻辑,async可以省略
3.5 错误处理
和Express错误处理中间件需要放置在应用末尾不同,Koa采用了洋葱圈模型,所以Koa的错误处理中间件需要在应用的最开始挂载,这样才能将整个请求-响应周期覆盖。
 1
 2
 3
 4
 5
 6
 7
 8
 9
10
11
|
// 错误处理中间件
async function errorHandler(ctx, next) {
	try {
		await next()
	} catch(e) {
		ctx.status = e.status || 500
		ctx.body = `System Error: ${ e.message }`
	}
}
// 最外层使用
app.use(errorHandler)
|
3.6 路由系统
- 路由是一个Web应用的核心功能。router就像一个指挥官,用户请求路由后,由它来决定渲染那个ejs页面,且业务逻辑仅仅只是执行service层提供的方法,也可能做一下错误处理,具体数据层面的实际操作交给service去实现。
- Koa为了精简核心并未包含路由功能,因此需要使用
koa-router模块来实现路由功能。
3.6.1 安装
3.6.2 使用
1
2
3
4
5
6
|
const koa = require('koa')
const Router = require('koa-router')
const app = new koa()
const router = new Router()
// 一般可以在实例化router时传入prefix选项
const router = new Router({ prefix: '/user' })
|
 1
 2
 3
 4
 5
 6
 7
 8
 9
10
11
|
router.get('/', async (ctx) => {
	ctx.body = 'Hello World'
})
router.get('/user', async (ctx) => {
	ctx.body = 'User'
})
// Koa-router支持多个路由函数,可以在指定路由使用也可以在整个路由对象使用
// 方式1
router.use(logger)
// 方式2
router.get('/', logger, (ctx) => {})
|
1
2
3
4
|
app.use(router.routes())
app.use(router.allowedMethods())
// 同一路由也可简写为
app.use(router.routes()).use(router.allowedMethods())
|
3.6.3 模块化路由
为了保持项目可维护性,建议将路由逻辑拆分到其他模块(routes文件夹)中
1
2
3
4
5
6
7
|
// routes/user.js
const Router = require('koa-router')
const router = new Router()
router.get('/login', (ctx) => {
	ctx.body = '用户登录'
})
module.exports = router
|
3.7 中间件的引入顺序
- 错误处理器。最先注册的中间件在最外层。以确保可以捕获全部错误
- 第三方中间件,也就是npm安装的
- 自定义全局中间件
- 路由文件
4 Koa的页面渲染与数据输出
4.1 使用ejs
1
2
3
4
5
6
|
const render = require('koa-ejs')
render(app, {
	root: './templates',
	layout: false,
	viewExt: 'ejs'
})
|
1
2
3
|
router.get('/login', async (ctx) => {
	await ctx.render('login', { title: '登录页' })
})
|
4.2 模板布局
Web页面一般是由头部、内容主体区域和底部组成的。可以在ejs中定义出整体布局框架:
 1
 2
 3
 4
 5
 6
 7
 8
 9
10
11
12
|
<!DOCTYPE html>
<html lang='en'>
<head>
...
<title><%= title %></title>
</head>
<body>
	<heder>我是头部</heder>
  <%- body %>
  <footer>我是底部</footer>
</body>
</html>
|
1
2
3
4
5
6
7
8
9
|
render(app, {
	root: './templates',
	layout: 'main',
	viewExt: 'ejs'
})
app.use(async (ctx) => {
	ctx.state.name = 'gsq'
	await ctx.render('home', { title: '首页' })
})
|
5 基于Koa开发博客系统
5.1 初始化
1
2
3
4
|
mkdir koa-blog-demo
cd koa-blog-demo
yarn init -y
yarn add koa koa-ejs koa-bodyparser koa-router bluebird
|
5.2 项目结构
| 根目录 |
文件 |
描述 |
| index.js |
|
入口文件 |
| middlewares |
|
中间件目录 |
|
authenticate.js |
认证中间件 |
| package.json |
|
|
| routes |
|
路由目录,处理路由请求与响应 |
|
post.js |
处理文章路由 |
|
site.js |
主页路由,负责读取文章列表并渲染到HTML上 |
|
user.js |
用户路由,负责登录和退出 |
| services |
|
业务目录,直接操作数据 |
|
post.js |
文章业务 |
|
user.js |
用户业务 |
| templates |
|
模板目录,听render调遣 |
|
index.ejs |
网站首页 |
|
login.ejs |
登录表单 |
|
main.ejs |
布局文件 |
|
post.ejs |
文章详情 |
|
publish.ejs |
发布表单 |
|
update.ejs |
编辑表单 |
源码链接:https://github.com/GSemir0418/koa-blog-demo
